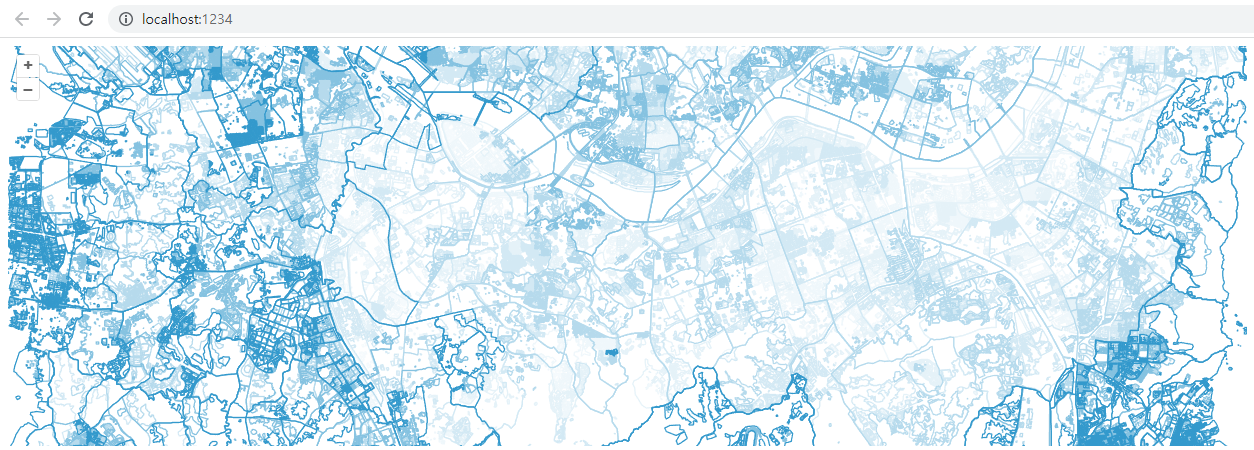
지난번에 이어 DB에 있는 데이터를 가져와 화면에 출력할 예정임.
1. 프로젝트 진행할 디렉토리 만들기
cd 또는 cd /d 사용하여 원하는 폴더로 이동
mkdir 디렉토리명
cd 디렉토리명
2. package.json 생성
npm init -y
3. 필요한 모듈 또는 플러그인 설치
npm install --save pg dotenv express axios cors ol
npm install --save-dev parcel-bundler
4. package.json 내용 수정 및 추가
{
    "name": "gis",
    "version": "0.0.1",
    "type": "module",
    "description": "get map data",
    "main": "main.js",
    "scripts": {
        "test": "echo \"Error: no test specified\" && exit 1",
        "start": "parcel index.html",
        "build": "parcel build --public-url . index.html"
    },
    "keywords": [
        "openstreetmap"
    ],
    "author": "",
    "license": "ISC",
    "dependencies": {
        "axios": "^1.4.0",
        "cors": "^2.8.5",
        "dotenv": "^16.0.3",
        "express": "^4.18.2",
        "ol": "^7.3.0",
        "pg": "^8.11.0"
    },
    "devDependencies": {
        "parcel-bundler": "^1.12.5"
    }
}
5. index.js 생성 및 db와 연결 되는지 확인
import pg from 'pg';

const { Pool } = pg;

const pool = new Pool({
  user: 'username',
  host: 'local 또는 127.0.0.1',
  database: 'db name',
  password: 'password',
  port: 5432,
});
async function conntectToPostfrsql() {
    try {
        await pool.connect();
        console.log("CONNETING SUCCESS");
    } catch (error) {
        console.error("CONNECTING FAIL");
    } finally {
        await pool.end();
    }
}

  conntectToPostfrsql();
6. .env 파일 생성 및 작성
	DATABASE_NAME='DB_Name'
	DATABASE_USERNAME='User_Name'
	DATABASE_HOST='localhost 또는 127.0.0.1'
	DATABASE_PASSSWORD='password'
	DATABASE_PORT=5432
7. server.js 생성 및 코드 작성 및 연결 확인

터미널에 node server.js 입력 후 출력값 또는 localhost:3000 링크 접속하여 확인

8. 화면 출력을 위해 Index.html 작성
<html>
    <head>
    <meta charset="UTF-8">
    <title>Accessible Map</title>
    <link rel="stylesheet" type="text/css" href="./node_modules/ol/ol.css" />
    <style>
        #map {
            width: 100%;
            height: 400px;
        }
    </style>
</head>
<body>
    <script src="./main.js"></script>
</body>
</html>
9. 화면에 출력할 수 있게 가공하는 main.js 작성
import { Map, View, Feature } from 'ol';
import VectorLayer from 'ol/layer/Vector.js';
import VectorSource from 'ol/source/Vector.js';
import { GeoJSON } from 'ol/format.js';
import axios from 'axios';
import { transformExtent, fromLonLat } from 'ol/proj.js';

const app = axios.create({
    baseURL: 'http://localhost:3000'
});

// map 넣어줄 div 생성
const mapDiv = document.createElement("div");
mapDiv.id = "map";
mapDiv.style.width = '100%';
mapDiv.style.height = "400px";
document.body.appendChild(mapDiv);

// 서울의 Bounding Box 좌표 (예시)
const bboxCoords = [126.764088, 37.413294, 127.183971, 37.715133];

// BBox 좌표를 올바른 좌표 체계로 변환
const bboxExtent = transformExtent(bboxCoords, 'EPSG:4326', 'EPSG:3857');

// 서울 영역의 Vector Source 생성
const vectorSource = new VectorSource({
    format: new GeoJSON(),
    loader: async function (extent, resolution, projection) {
        await app.post('/',
            { sql: `SELECT 'Feature' AS type, ST_AsGeoJSON(ST_Transform(way, 4326))::jsonb AS geometry, row_to_json((SELECT p FROM (SELECT name) AS p)) AS properties FROM planet_osm_polygon WHERE ST_Within(ST_Transform(way, 4326), ST_MakeEnvelope(${bboxCoords.join(',')}, 4326))` },
            { headers: { 'Content-Type': 'application/json' } })
            .then((response) => {
                const data = response.data;
                const features = data.rows.map((row) => {
                    const geometry = new GeoJSON().readGeometry(row.geometry);
                    geometry.transform('EPSG:4326', 'EPSG:3857'); // 좌표 변환 추가
                    return new Feature({
                        geometry: geometry,
                        name: row.properties.name
                    });
            });
            this.clear(); // 기존에 추가된 Feature들을 삭제
            this.addFeatures(features);
        })
        .catch((error) => {
            console.log(error);
        });
    },
});

const vectorLayer = new VectorLayer({
    source: vectorSource,
});

const map = new Map({
    layers: [vectorLayer],
    target: mapDiv,
    view: new View({
        center: fromLonLat([127.0, 37.5]), // 초기 중심 좌표 설정
        zoom: 10, // 초기 줌 레벨 설정
        extent: bboxExtent, // 초기 뷰를 BBox 영역으로 설정
      }),
});

// OpenLayers 지도 생성
map.setTarget('map');
9. main.js에 맞추어 server.js 내용 수정
import express from 'express';
import pg from 'pg';
import dotenv from 'dotenv';
import cors from 'cors';
import path from 'path';

const { Pool } = pg;
const app = express();
app.use(cors());
app.use(express.json());
app.use(express.urlencoded({ extended: false }));
dotenv.config();

const __dirname = path.resolve();
const port = 3000;

const pool = new Pool({
    user: process.env.DATABASE_USERNAME,
    host: process.env.DATABASE_HOST,
    database: process.env.DATABASE_NAME,
    password: process.env.DATABASE_PASSSWORD,
    port: process.env.DATABASE_PORT,
});

app.get('/', async (req, res) => {
    res.sendFile(__dirname + "/index.html");
});

app.post('/', async (req, res) => {
    const sql = req.body.sql
    let result = null;
    const client = await pool.connect();
    try {
        result = await client.query(sql);
        res.send(result);
    } catch (error) {
        console.error("CONNECTING FAIL");
    } finally {
        await pool.end();
    }
})

app.listen(port, () => {
    console.log(`Server listening at http://localhost:${port}`);
});
10. 정상 작동 되는지 확인
back에 해당되는 server 실행
node server.js

front에 해당되는 server 실행
npm start
화면에 출력하기 끝!
근데, 이걸론 미완성이므로 추가 되는대로 수정할 예정임.
반응형
'project' 카테고리의 다른 글
| [OpenStreetMap 활용하여 지도 사이트 만들기] OpenLayers(ol/style) 사용하여 도로 그리기 (0) | 2023.06.20 |
|---|---|
| [OpenStreetMap 활용하여 지도 사이트 만들기] pg_tileserv 설치하여 tile server 만들기 (0) | 2023.06.02 |
| [OpenStreetMap 활용하여 지도 사이트 만들기] PostgreSQL Windows 설치 및 DB 설정 (1) | 2023.05.26 |
| PostgreSQL_DB에 확장 모듈 생성 시 오류 발생 해결 과정_The specified module could not be found (0) | 2023.05.26 |
| 지도 데이터 교체 및 gis database에 로드 시 오류 발생 해결 과정 (0) | 2023.05.23 |