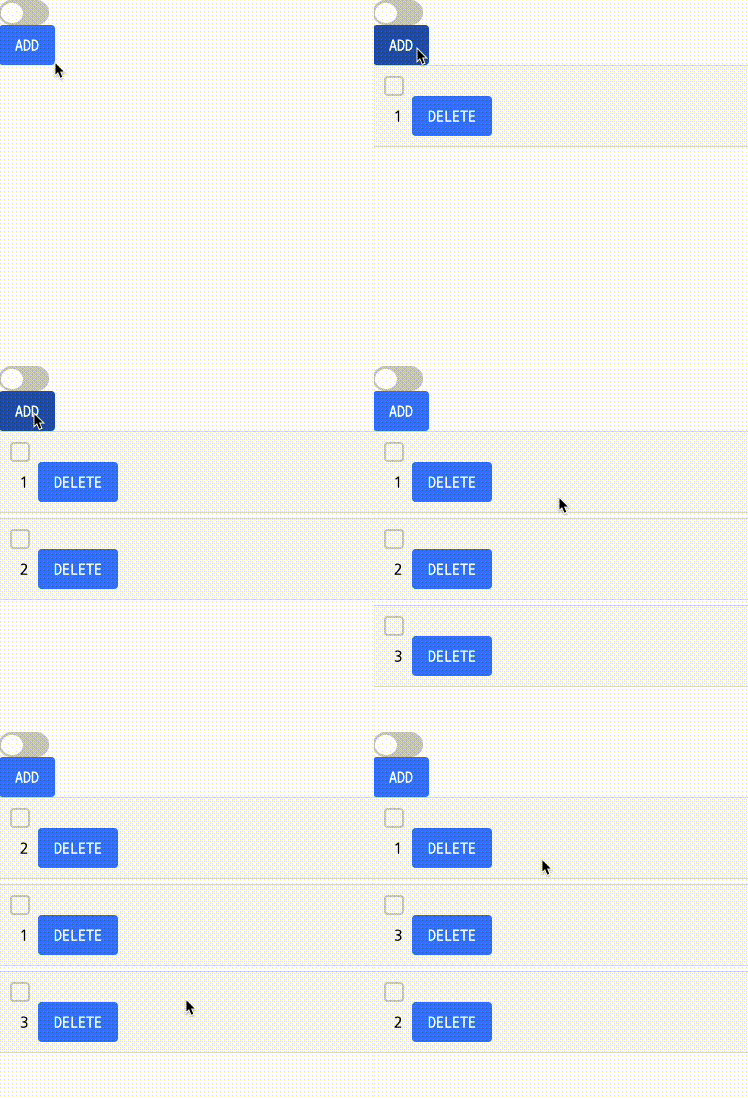
순서를 drag & drop으로 변경하고 싶은데 라이브러리가 굳이 필요할까?
그래서 만들어 보았다.
HTML에 보면 Drag and Drop API가 존재한다. (MDN)
이걸 참고해서 만들면 된다.
일단 만들고 있던 todo app 코드 중 일부다.
todo 상태관리
// src/store/todo.js
import { createSlice } from '@reduxjs/toolkit';

const loadTodos = () => {
  const savedTodos = localStorage.getItem('todos');
  return savedTodos ? JSON.parse(savedTodos) : [];
};

const saveTodos = todos => {
  localStorage.setItem('todos', JSON.stringify(todos));
};

export const todoSlice = createSlice({
  name: 'todo',
  initialState: loadTodos(),
  reducers: {
    todoAdded: (state, action) => {
      state.push({
        id: Date.now(),
        text: action.payload.text,
        completed: false,
      });
      saveTodos(state);
    },
    todoReset: state => {
      state = [];
      saveTodos(state);
    },
    todoRemoved: (state, action) => {
      const newState = state.filter(todo => todo.id !== action.payload.id);
      saveTodos(newState);
      return newState;
    },
    todoChanged: (state, action) => {
      const { id, text, completed } = action.payload;
      const todo = state.find(todo => todo.id === id);

      if (todo) {
        if (text !== undefined) {
          todo.text = text;
        }

        if (completed !== undefined) {
          todo.completed = completed;
        }
      }

      saveTodos(state);
    },
    todoReordered: (state, action) => {
      const { fromIndex, toIndex } = action.payload;

      if (fromIndex >= 0 && toIndex >= 0 && fromIndex < state.length && toIndex < state.length) {
        const [todo] = state.splice(fromIndex, 1);
        state.splice(toIndex, 0, todo);
      }

      saveTodos(state);
    },
  },
});

export const { todoAdded, todoChanged, todoRemoved, todoReordered } = todoSlice.actions;

export default todoSlice.reducer;
메인 화면
// src/pages/main/Main.jsx
// ...생략...

export default function MainPage() {
  const { message, type, show, showToast } = useToast({ autoClose: true, duration: 3000 });

  return (
    <>
      <div style={{ width: '60px', height: '25px' }}>
        <ThemeToggleSwitch />
      </div>
      <Add showToast={showToast} />
      <List />
      <Toast message={message} type={type} show={show} />
    </>
  );
}
리스트 컴포넌트
// src/components/List.jsx
// ... 생략 ...

const TodoText = styled.span`
  color: ${({ completed }) => (completed ? '#999' : '#000')}; /* 완료되면 회색 */
  text-decoration: ${({ completed }) => (completed ? 'line-through' : 'none')}; /* ✅ 취소선 */
  font-size: 1.6rem;
  margin: 0 10px;
`;

const List = () => {
  const todos = useSelector(state => state.todo);
  const dispatch = useDispatch();

  return (
    <ul>
      {todos.map(todo => (
        <li key={todo.id}>
          <Checkbox
            checked={todo.completed}
            onChange={() => dispatch(todoChanged({ id: todo.id, completed: !todo.completed }))}
          />
          <TodoText completed={todo.completed}>{todo.text}</TodoText>
          <Button onClick={() => dispatch(todoRemoved({ id: todo.id }))}>DELETE</Button>
        </li>
      ))}
    </ul>
  );
};

export default List;
todo에 보면 순서 변경을 위한 코드(todoReordered)를 먼저 만들어놨었다.
list에서 drag & drop 만 추가하면 되는 상태다.
useRef로 dragItemIndex를 추적하여 fromIndex 저장할 수 있도록 수정해야 한다.
1. useRef 추가
import { useRef } from 'react';
// ...생략...


const List = () => {
  // ...생략...
  const dragItemIndex = useRef(null);
  // ...생략...
}
기존에 있던 li 태그에 필요한 옵션들을 추가해야 한다.
2. li 태그 수정
import { useRef } from 'react';
// ...생략...


const List = () => {
  // ...생략...

  return (
    <ul>
      {todos.map((todo, index) => (
        <li
          key={todo.id}
          draggable
          onDragStart={() => {}}
          onDragOver={() => {}}
          onDrop={() => {}}
        >
  // ...생략...
}
drag 가능한 요소로 만들기 위해서는 draggable을 줘야 한다.
3. 드래그 이벤트 핸들 추가
ondragstart, ondragover, ondrop 각 드래그 이벤트 핸들러를 만들어야한다.
하나의 요소를 draggable로 만들기 위해서는 draggable와 ondragstart 전역 이벤트 핸들러를 아래 예제 코드와 같이 추가해야합니다. -MDN
// ... 생략 ...
  const handleDragStart = index => {
    dragItemIndex.current = index;
  };

  return (
    <ul>
// ... 생략 ...
드래그 시작할 때는 해당 요소의 index를 저장해준다.
// ... 생략 ...
  const handleDragOver = e => {
    e.preventDefault();
  };

  return (
    <ul>
// ... 생략 ...
리스트 항목 위로 드래그 중일 때
다른 이벤트 (터치 이벤트나 포인터 이벤트) 가 일어나지 않도록 preventDefault 메소드를 추가했다.
// ... 생략 ...
  const handleDrop = index => {
    const fromIndex = dragItemIndex.current;
    const toIndex = index;

    if (fromIndex !== null && fromIndex !== toIndex) {
      dispatch(todoReordered({ fromIndex, toIndex }));
    }

    dragItemIndex.current = null;
  };

  return (
    <ul>
// ... 생략 ...
마지막으로 handleDrop으로 변경된 index값을 저장하고,
순서가 다를 때 Redux 액션으로 실제 상태(state)에서 순서를 바꾸고 localStorage에 저장까지 한다.
그리고 모든 작업이 완료 됐으므로 저장했던 인덱스 초기화한다.
이 핸들러를 li tag에 적용해준다.
4. 이벤트 적용
// ... 생략 ...
 return (
    <ul>
      {todos.map((todo, index) => (
        <li
          key={todo.id}
          draggable
          onDragStart={() => handleDragStart(index)}
          onDragOver={handleDragOver}
          onDrop={() => handleDrop(index)}
        >
          <Checkbox
            checked={todo.completed}
            onChange={() => dispatch(todoChanged({ id: todo.id, completed: !todo.completed }))}
          />
          <TodoText completed={todo.completed}>{todo.text}</TodoText>
          <Button onClick={() => dispatch(todoRemoved({ id: todo.id }))}>DELETE</Button>
        </li>
      ))}
    </ul>
  );
};

코드는 여기에서 볼 수 있다.
끝!
반응형
'공부합시다 > React' 카테고리의 다른 글
| Authenticated Routes 사용기 (3) | 2025.07.25 |
|---|---|
| 이벤트 오작동 시 Event.preventDefault() 적용 (0) | 2025.03.20 |
| [기본 개념] React (1) | 2025.03.17 |
| [React] webpack < 5 used to include polyfills for node.js core modules by default. (2) | 2022.11.28 |
| [React] Router 추가하기 (0) | 2022.11.25 |